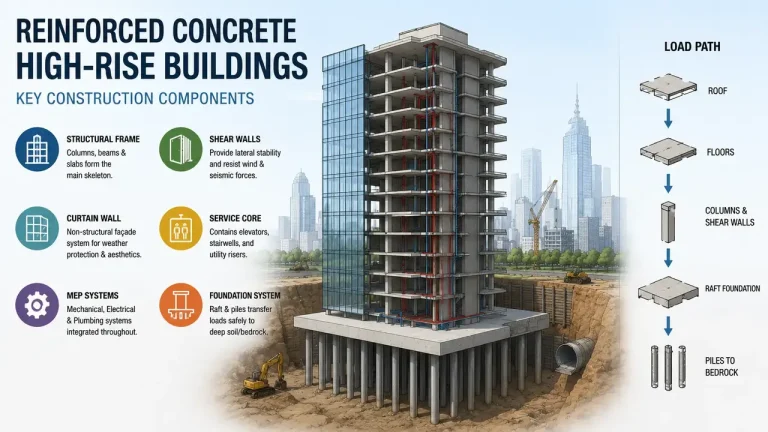

15 Common Home Renovation Mistakes
And how to sidestep them entirely — covering structural integrity, cost management, and the legal permit maze renovation.
01 Demolishing a Load-Bearing Wall
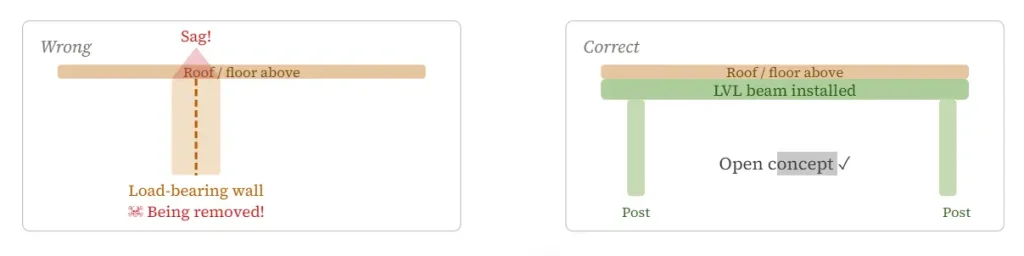
The Mistake: In a fit of enthusiasm for an “open concept” layout, a homeowner takes a sledgehammer to a wall holding up the second floor or the roof. The immediate sign? A sagging ceiling or doors that won’t close.
How to avoid it: Before you remove even a single piece of drywall, consult a structural engineer or licensed contractor. If a wall runs perpendicular to the ceiling joists above, it is almost certainly load-bearing. Removing one requires installing a proper LVL or steel beam plus temporary shoring. Budget for engineering stamps — it is cheaper than a collapsed house.
02 Ignoring Water Intrusion and Mold
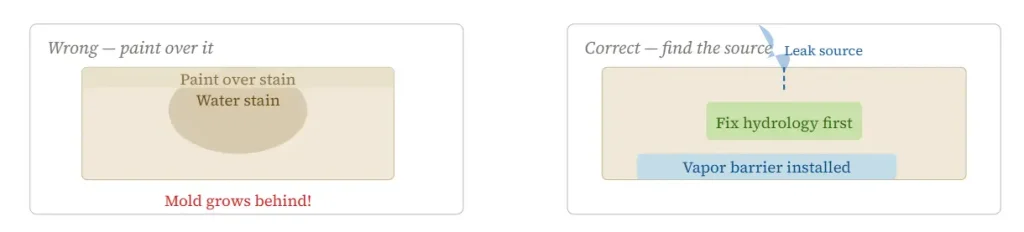
The Mistake: Painting over a water stain or drywalling over a damp basement wall hides a time bomb. Moisture destroys wood framing, attracts termites, and creates black mold that compromises indoor air quality.
How to avoid it: During demo, check every exterior wall and subfloor for rot using a moisture meter. Find and fix the source first — roof leak, cracked foundation, or poor grading. A dehumidifier and vapor barrier are non-negotiable in basements and crawl spaces.
03 Messing with Trusses for Storage
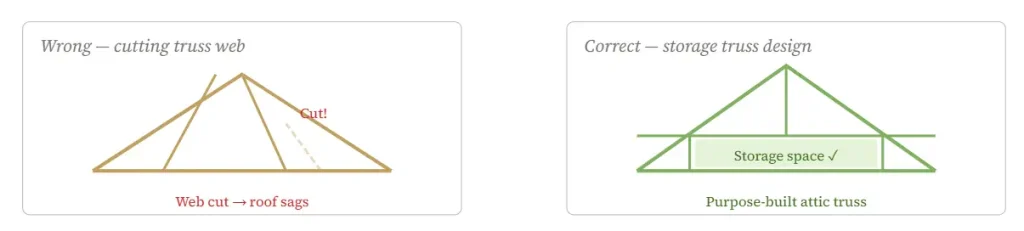
The Mistake: Cutting through the bottom chords of roof trusses to lay down plywood for storage. Trusses are engineered as a single system — cutting one web member can cause the entire roof to deflect, sag, or collapse under snow load.
How to avoid it: If you have trusses, they are not meant for heavy storage. For attic storage, have a truss manufacturer design a purpose-built “storage truss” or “attic truss.” If you have stick framing (rafters and ceiling joists), modifications are possible but only under an engineer’s guidance.
04 Installing Heavy Materials on Unsuitable Floors
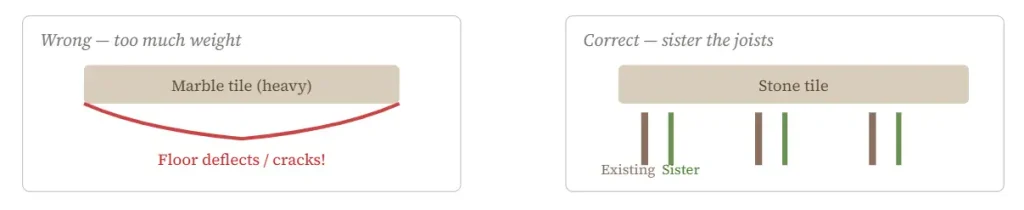
The Mistake: Falling in love with natural stone tile or a cast iron tub without checking if the subfloor can handle the weight. Standard joists are designed for 40 lbs/sq ft; stone tile often requires twice the stiffness rating.
How to avoid it: Use the Deflect-O-Lator tool online to calculate your floor’s deflection rating. You may need to sister the joists (glue and screw additional lumber to the existing ones) or add a beam and posts in the basement below.
05 Pouring Self-Leveler Without Checking the Subfloor
The Mistake: Pouring self-leveling compound over plywood that wasn’t screwed down. The compound cracks because the plywood flexes, or seeps through gaps and drips onto the ceiling below.
How to avoid it: Screw down the plywood subfloor every 4–6 inches to eliminate movement, then apply a latex primer. Don’t pour more than 1.5 inches at a time. For wood subfloors, consider an uncoupling membrane (like Schluter-DITRA) between the leveler and the tile.
06 Failing to Add a 20% Contingency Fund
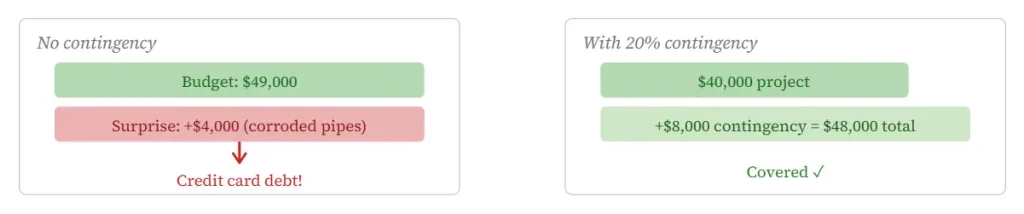
The Mistake: Having exactly $50,000 saved and getting a quote for $49,000, then the plumber opens the wall and finds corroded cast iron pipes — a $4,000 surprise with no cash left.
How to avoid it: Always add a 20% “unforeseen circumstances” buffer. If your renovation costs $40k, you need a $48k total fund. If you don’t use it, great — you have money for furniture. If you do, you aren’t taking out a high-interest credit card mid-project.
07 Changing Your Mind After Construction Starts
The Mistake: You picked a $4/sq ft tile, but on day three of demo you see a $20/sq ft handcrafted Moroccan tile. Then you change the cabinet pull finish, then the light fixtures. Change orders are the silent budget killers.
How to avoid it: Finalize every single material, finish, and fixture before the contractor arrives. Add a “Change Order Policy” to your contract requiring written approval for any change over $500, with a 10% restocking fee for returns.
08 Underestimating Labor vs. Materials

The Mistake: Seeing LVP at $2/sq ft and assuming a 1,000 sq ft floor costs $2,000 — forgetting labor, underlayment, trim, transitions, removal of old flooring, and dump fees that triple the price.
How to avoid it: When getting quotes, ask for a “Material Takeoff” and a “Labor Breakdown.” Labor typically accounts for 40–60% of the total project cost. For DIY, calculate the cost of your time plus tool rental fees.
09 DIY-ing a Multi-Trade Project
The Mistake: Watching a YouTube video on tiling a shower and deciding to save $3,000. Three weeks later, waterproofing fails, water leaks into the kitchen ceiling, drywall rots, and you hire a professional to rip everything out and start over.
The DIY Rule of Three: If a job requires more than three different professional trades (plumbing, electrical, waterproofing, carpentry), you likely shouldn’t DIY it. If you insist, buy a water leak alarm and flood-test your shower pan for 24 hours before tiling.
10 Moving Fixtures vs. Working with Existing Layouts
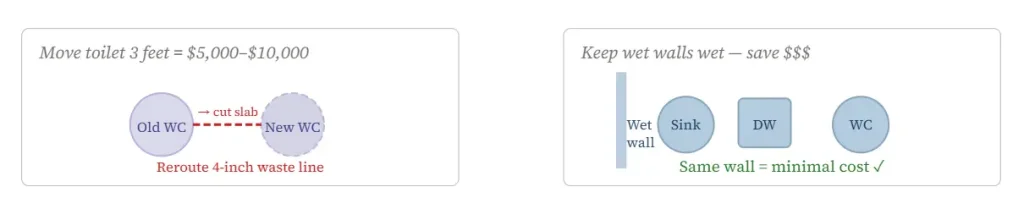
The Mistake: Moving the toilet, sink, and shower to opposite walls. Moving a toilet just 3 feet requires cutting the concrete slab, rerouting the 4-inch waste line, and re-venting the stack — costing $5,000 to $10,000.
How to avoid it: “Keep wet walls wet.” Keep kitchen and bathroom fixtures on the same walls as the original plumbing. Moving a sink 12 inches left might cost $800; moving it 12 feet costs $8,000. Always get a “feasibility quote” from a plumber before designing the layout.
11 “It’s Just a Small Job” — Assuming No Permit Needed

The Mistake: Skipping a permit for a “small” job. Six years later, you go to sell the house. The buyer’s inspector notices the non-permitted bathroom and demands you tear it out or reduce the price by $30,000.
How to avoid it: Check your local municipal code. Any change to structural, electrical, plumbing, or mechanical systems generally requires a permit. If you skip one, your insurance company can also deny a claim if a fire or flood results from unpermitted work.
12 Failing to Understand “Grandfathering”
The Mistake: Assuming older wiring (aluminum or knob-and-tube) can stay because it was “legal then.” The moment you open a wall for a renovation, the Authority Having Jurisdiction can require you to bring the entire system up to current code.
How to avoid it: Before pulling a permit, get a code-compliance home inspection. Ask the building department directly: “If I open this wall, what am I forced to upgrade?” Budget for the worst-case scenario — usually a full panel upgrade to 200 amps
13 Starting Work Before the Permit is Issued
The Mistake: You submit drawings, assume approval after a week of silence, and tear out the kitchen. The inspector arrives, sees no permit placard, and issues a Stop Work Order — with fines that double every day.
How to avoid it: Do not touch a single tool until you have the stamped permit in hand or the digital approval email. If you need to demo something for safety (like mold), get a “Limited Demolition Permit” first. In some jurisdictions, working without a permit is a misdemeanor.
14 Forgetting Zoning Setbacks for Additions
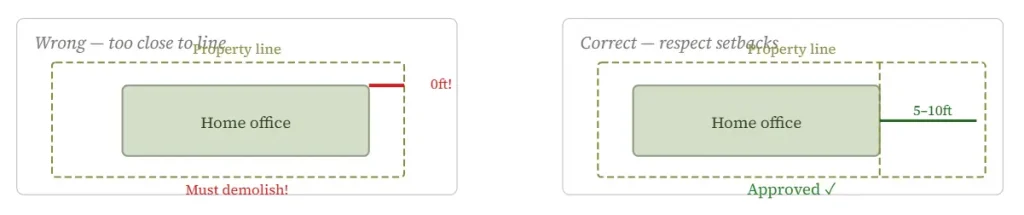
The Mistake: Pouring a backyard office foundation right up to the property line. The city surveys the lot and discovers the structure is 5 feet over the setback — requiring demolition of the concrete foundation.
How to avoid it: Check your city’s zoning map for front, rear, and side setbacks. For a shed or ADU, you usually need 5–10 feet from the property line. Also check height restrictions (usually 15 feet for detached structures) and lot coverage limits.
15 Not Scheduling the Final Inspection
The Mistake: The drywall is up, the paint is dry, and the contractor leaves. You forget to call the building inspector for the Final Sign-Off. Five years later at sale, the permit shows “Open” — you must cut holes in your new walls for re-inspection.
How to avoid it: Put the final inspection date on your calendar the day you pull the permit. Do not make the final payment to your contractor until you have a signed Certificate of Occupancy or Final Approval card. Keep this in your home’s permanent file with the deed.
A successful renovation isn’t about finding the cheapest tile or the fastest demo crew. It is about respecting the physics of your structure, the reality of your bank account, and the law of your municipality. Plan ahead, budget generously, and always get the permit.
Check : A Step-by-Step Renovation Planning Guide for Beginners